Kraken X42, Kraken G12 and installation of a liquid cooling system on GPU (2080ti)
It has been said repeatedly by intelligent men on the web, that liquid cooling systems make sense only if the following conditions apply:
- your chassis have very limited space;
- cold plate can be installed directly on chip;
- you need to cool something really hot.
In other words, this option is perfect for GPUs.
Why you need this
To decrease the GPU temperatures radically and — consequently — to get higher operating frequencies and less noisy set-up. Obviously, it makes sense to perform such procedures only if your GPU really heats a lot and costs higher than average, because a ready-to-use closed cooling system solution with an adapter plate (to be installed on the GPU) plus everything else (more about this coming later) will cost you around 250 USD. Therefore it makes sense to install such system only if you have something like 2080/2080ti.
Overview of the procedure
You remove the standard cooling system from your GPU (additionally, in 90% of cases you also remove the back plate), you install the cold plate and the pump unit, then you install the GPU inside the case, and then you install the heat exchange unit together with the radiator fan inside the case as well.
Below is the description of how to install a liquid cooling system successfully (from the first try!) on your 2080 ti. In this example we will take the Kraken X42 + Kraken G12, because this set-up seems to be optimal for the cooling efficiency vs. noise factor.
General recommendations
- If this is your first time installing such systems, it is best to have someone to help you with the installation.
- The heatsink of the radiator is rather soft and crumples easily, so you need to handle it with care.
- The tubes are extremely rigid, and it’s a hell of a problem.
- If the fan and the pump don’t start, it’s most likely that the shitty connector fell off from the pump port (it would be fair to make the designers suffer for that greatly).
- You will hear squelching noise of the pump for the first 10 minutes only.
- Some light cracking is audible all the time, but the frequency range of that sound is easily absorbed by the transparent chassis panel.
- If you have mATX chassis (as in my case) you need to disassemble everything to make sure the cables are accurately routed. Looking on the bright side — this will allow to clean all the dust.
- Be ready to give it a few tries before you do everything correctly and accurately (especially if this is your first time with liquid cooling systems). Plan around 2 hours for the whole procedure.
- You need two internal USB 2.0 ports on the board available: one to connect your liquid cooling system, and another one to connect the fan controller (more about this coming below).
What you need
Heatsinks for the coils and other elements of the power circuit. I have prepped a homemade diagram (https://yadi.sk/i/28WBX-0ONFPPpg) of the 2080 ti, where:
- Blue — elements, which the manufacturer decided to cover with heatsinks.
- Red — width and length measurements.
- Green — areas, which go under the adaptor plate and the max heights of the heatsinks.
With this said, you will need to get prepared in advance and order some stuff from China:
- Heatsinks for the coils and memory modules: https://ru.aliexpress.com/item/32886861250.html
- Heatsinks for the power circuits: https://ru.aliexpress.com/item/32816325819.html
- Thermal conductive adhesive tape: https://ru.aliexpress.com/item/32980392132.html
If you are a perfectionist, you can also get the following:
- Noctua NT–H2 thermal compound, which will drop the temperature off two degrees more compared to the standard thermal compound on the liquid cooler radiator.
- Noctua NF–B9 fan to replace the standard fan (it will be quieter and more efficient).
- Noctua NF–A6x25 fan to cool the power circuits on the left side from the GPU.
- A stand to support the GPU: https://ru.aliexpress.com/item/32961704920.html
- NZXT GRID+ V3 fan controller to automate operation of all fans in the chassis smoothly.
- Adaptor for the fan on the G12 adaptor plate, so that you can connect it to the GPU: Https://ru.aliexpress.com/item/1653174414.html This cable makes sense only if your GPU is equipped with the necessary port. For example, Founder’s Edition is missing this port, but the Gigabyte it all good to go.
- Alcohol wipes from the nearby pharmacy, around 20 pieces to be on the safe side.
- You connect your liquid cooling system to the SATA power, and the fan controllers to the Grid+ V3 and then the molex. So, if chassis are missing molex power cable (as is usually the case today), you should get a molex (male) – SATA (female) adaptor and use it to connect your fan controller to SATA.
Step 1
Remove the standard cooling system, wipe diligently all elements and circuits (where you’re going to attach your heatsinks) with alcohol wipes and attach the heatsinks to the board, where circuits should heat up normally (see my homemade diagram by following the link above):
I have attached a tediously looking manually cut heatsink, but you can use those rectangular little blocks here as well, which are placed over the coils on the left side. Please take extra care: factory adhesive tape on the heatsinks sticks poorly, and when the circuit heats — twice as poorly. So, you can use that, or remove it carefully from the heatsink right away (using any plastic card and alcohol wipes) and attach the heatsinks using conductive adhesive tape, which you buy separately. Take my word, it sticks much better.
Please note, that the heatsinks on the corner memory units should be attached at a slight angle, otherwise you will not be able to click the brackets of the cold plate firmly into place.
Step 2
Install the pump via the adaptor plate, place the fan on the plate, assemble the cables with cable ties (included with the G12). You should end up with something like this:
For your 2080 ti you need to use the AMD retention brackets, included with Kraken G12.
Think carefully before you start, where you are going to place the heat exchange unit, because based on this you will need to turn the pump in the bracket mount correctly. As for the heat-exchange unit installation, it needs to meet the following requirements:
- It should not intake hot air.
- Hot air, heated by the unit, should not stay inside the case.
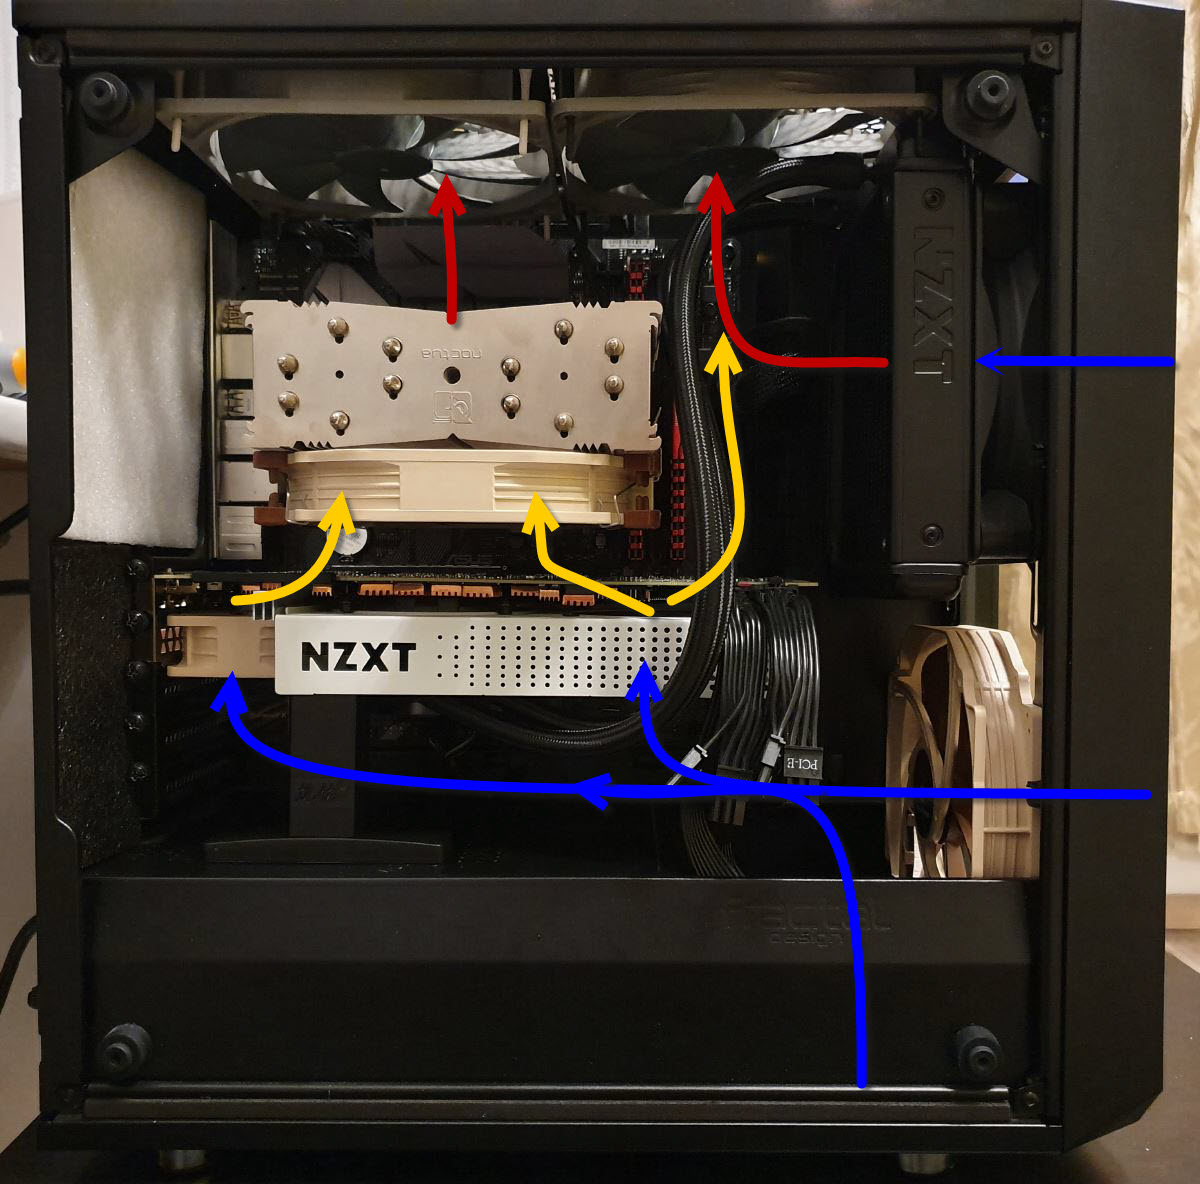
In my case (see the picture below) this was solved easily: I installed the heat-exchange unit in the upper right corner of the chassis, and the fan intakes cool air from the front. Then this air, already heated, is immediately taken up and out by the exhaust fan.
One more thing: before you click the radiator firmly into the connector on the adapter plate, think carefully if you have enough room to tighten the screws.
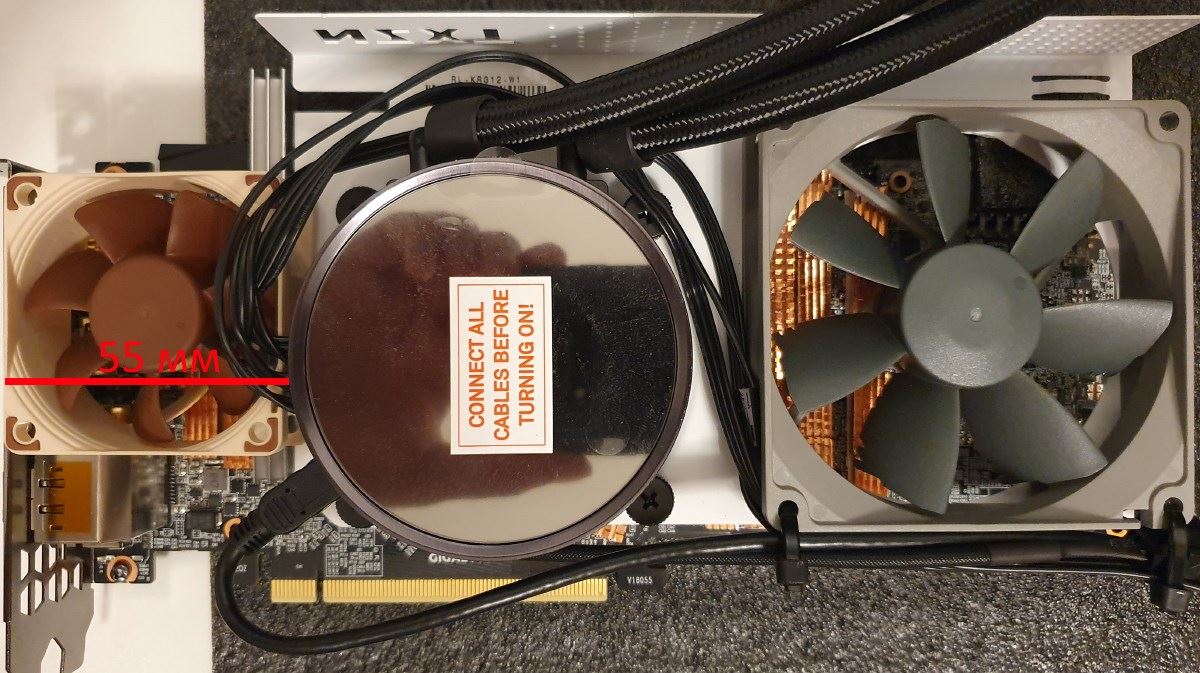
You have only 55 mm between the pump and the attachment plate of the chassis to the left, therefore the only thing that will fit this room is a 60mm fan (the one and the only Noctua NF–A6x25). In my case the fan is firmly secured by the cables of the pump connector, therefore there is no need to attach in additionally in any way. I mean, literarily you just put your fan in place, and it stays there all by itself.
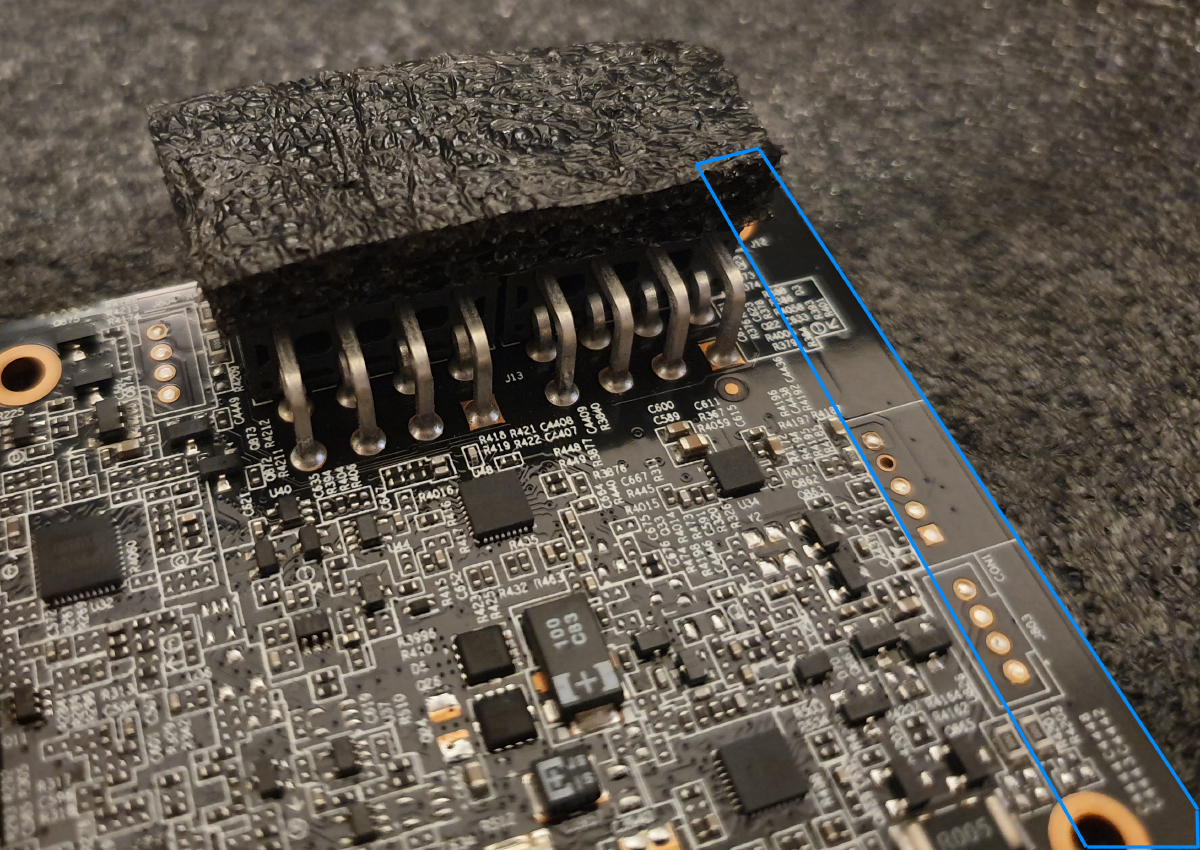
And the last detail at this step: there are small sticky foam supports included in the Kraken G12 package, which I didn’t manage to use because they are a bit bulky and should rest somewhere on the board, which is free of electric circuits, and this becomes a real challenge. In case with 2080 ti, this part of the board is not covered by the G12 adaptor plate (it is marked with blue on the picture below). Therefore I suggest to stick a soft fitting on the PWC:
In a sense it will support the board edge to some extend and prevent it from bending down; it will also prevent G12 adaptor plate from rattling.
Step 3
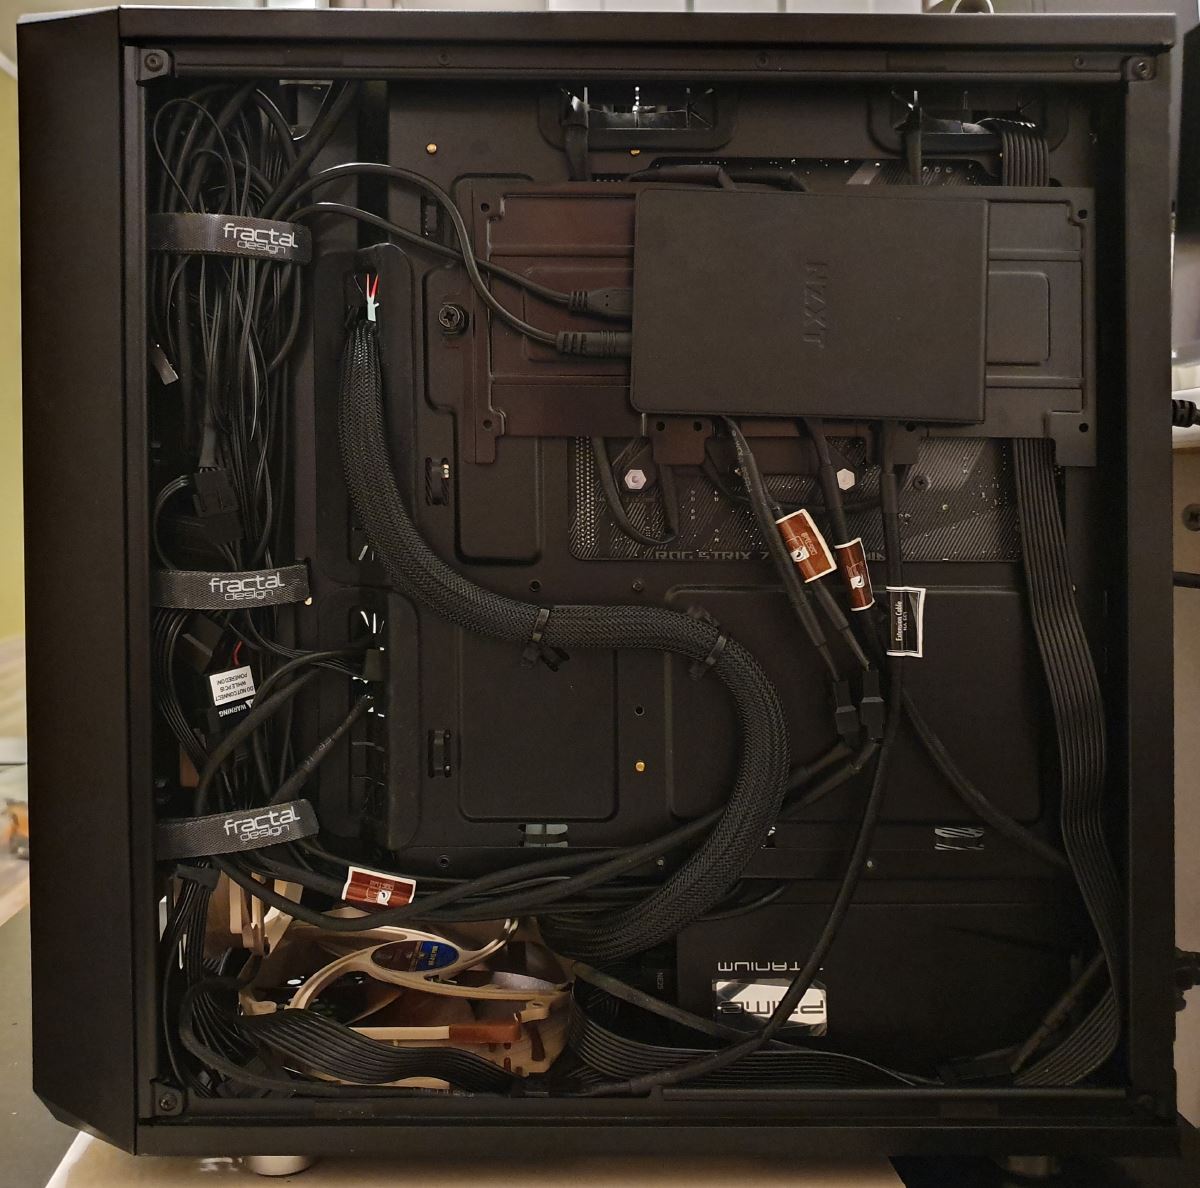
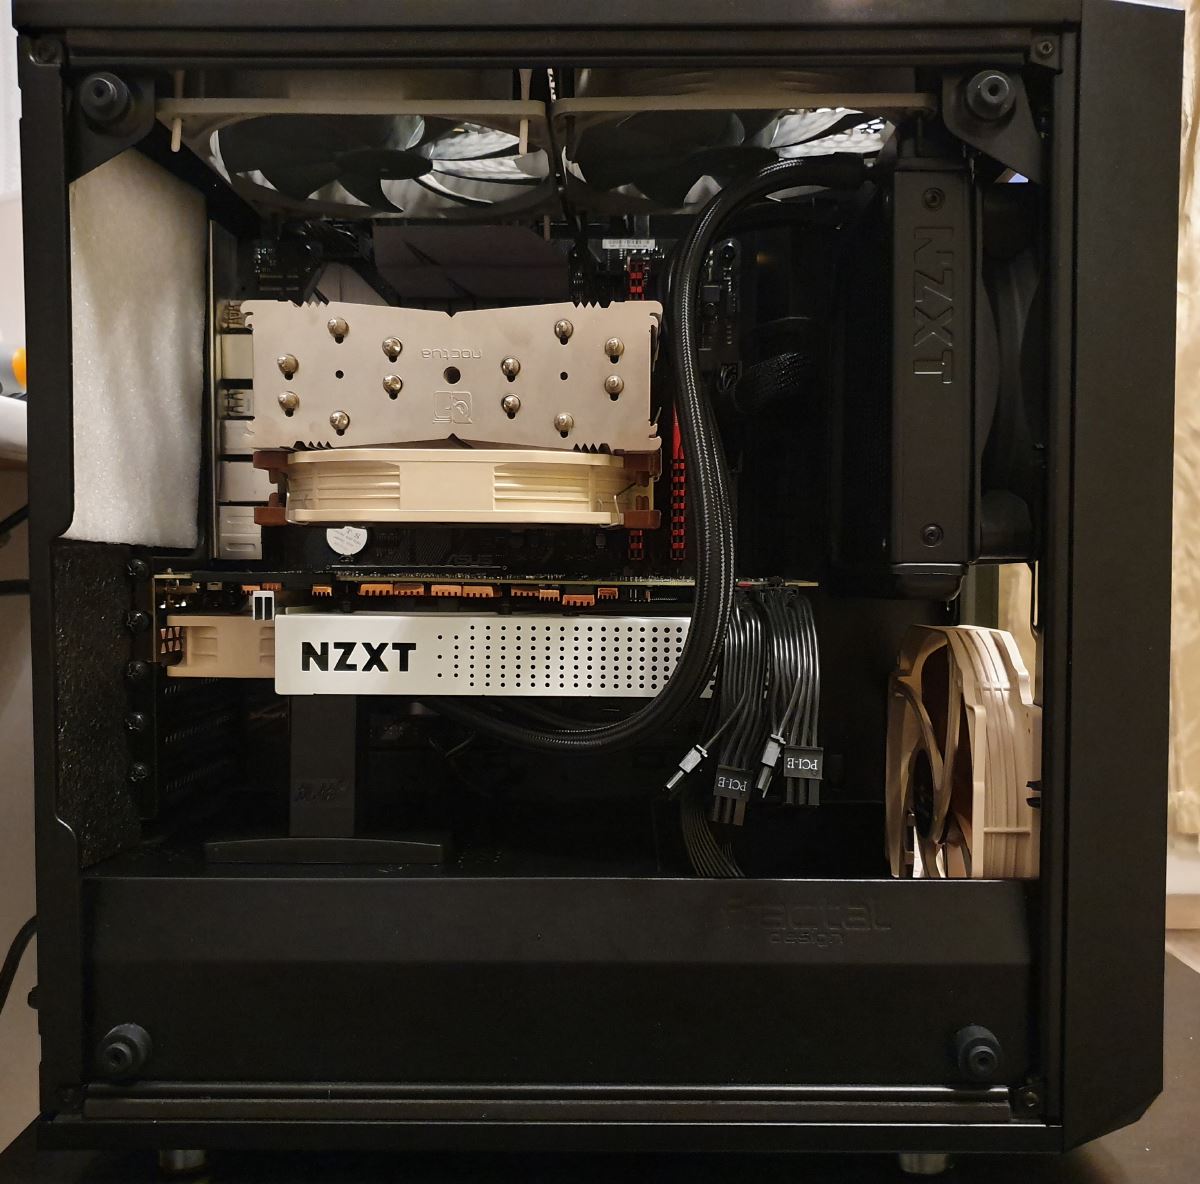
Put the fan controller into the case, connect everything to the controller and tidy up. This is what I got in the end (I have the Fractal Design Meshify C Mini case):
Controller is equipped with strong magnets, therefore you can easily attach it to any iron plate and leave it there with no additional fuss.
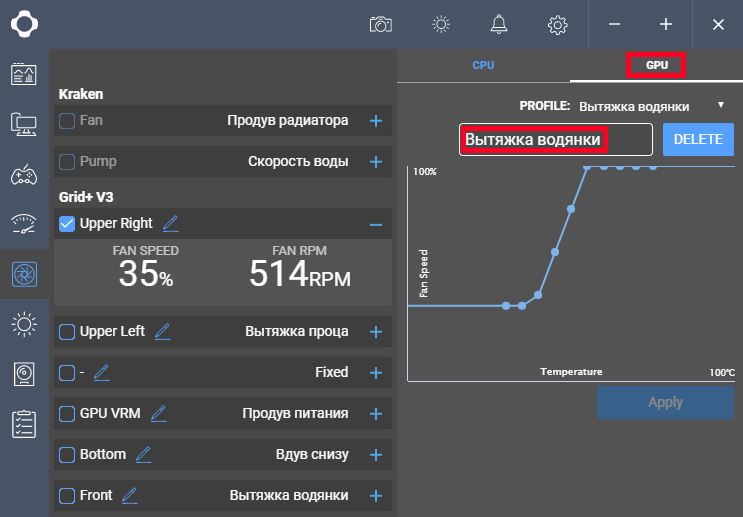
A couple of words, why you need a separate fan controller: the main issue is that any dedicated software can either take readings from the CPU and control chassis fans (usually, such software is supplied by motherboard manufacturers), or take readings from the GPU and control only GPU fans (take, for example, MSI Afterburner). If you want to automate the air exchange inside the PC case completely, you need a solution, that will allow crossed data exchange, which is: GPU temperature reading and controlling all fans, including chassis fans. The need to have this is obvious, because with the GPU temperature increasing you need to increase the cool air intake from outside and increase air exhaust from the PC case. This is why you need the controller, because it allows to implement such management of fans and air flows. For example, you can associate your right (upper) exhaust fan (see below) with the GPU temperature:
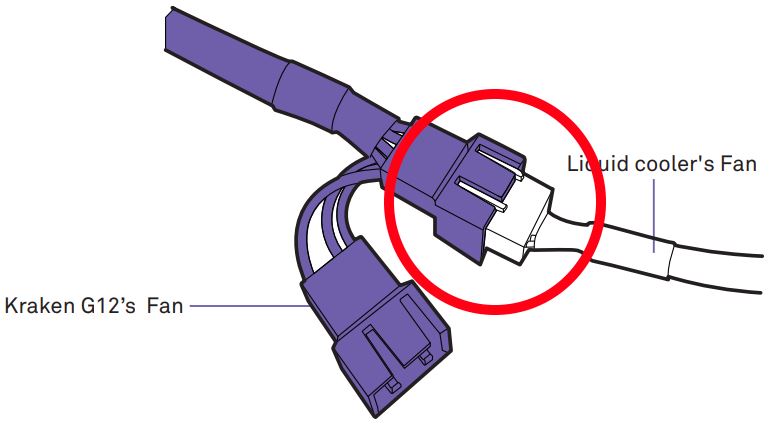
The NZXT CAM app I am talking about is a rather intuitive piece of software, and it allows to control the pump as well as the fans, connected to the controller. You only thing you need to know in advance is the rpm of the CPU fan, which is connected to the motherboard, because the controller can’t read it on its own. If you want to make it work, you need to connect the CPU fan to the liquid cooler’s connector, as shown below:
Once the CPU fan is connected, you will see a certain figure on the app dashboard (marked red):
Then you just need to configure the speed curve for this fan, using the NZXT CAM app.
The next step is to put the support for the GPU neatly in place.
In the end you should have something like this:
Airflows are shown on the picture below:
Since the power circuits heat up only a little in reality (yellow arrows in the picture above can be easily replaced with the blue ones), the CPU radiator does not heat up additionally.
Results
At standard voltage/frequency curve, no overclock, with ambient temperature around 26°С, using standard cooling system
Before:
- 74°С with the Furry Donut running.
- 50°С under load of standard office software.
After:
- 49°С with the Furry Donut running.
- 45–47°С under gaming load.
- 28–29°С under load of standard office software.
In other words, you win 20°С in idle mode and 25°С under load.
You should note, that with no load the system is completely quiet, and at load the system produces around 45 dB — ok, that’s true — but the GPU temperature doesn’t go over 45–47°С, and it’s steady. You can re-configure the fans for 55°С for example, and the system will stay very quiet at all times. Another option is downvolting GPU, and you will be in heaven. For example, my GPU keeps steady 2070 MHz at 975 mV.
That’s it.
Ultimate FAQ:
I have an MSI/ASUS/GIGABYTE/EVGA etc. 2080/2080ti. Will my board look the same or similar to the one described here?
99% chance is it will be the same. Yes, of all others, vendors do not change the circuit engineering of the 2080/2080ti much.
Are heatsinks absolutely necessary?
No, but you need to keep in mind, that coils heat up a great deal and power circuits to the left of the GPU are not blown with air at all. Also keep in mind, that temperature directly affects deterioration of any unit. And the price of a 2080 and especially the 2080 ti is not that cheap, to put it mildly. You will also be tempted to accelerate your GPU with the liquid cooling system installed, and with the voltage increased, too. You got the idea, right? Be wise.
Is it absolutely necessary to have a second fan?
See the answer to the first question above.
What will the temperature on the 2080 ti power circuits be under load, if I don’t attach any heatsinks?
With the Furry Donut running:
- on the coils to the right (under the fan) – 62 degrees
- on the coils to the left – 68 degrees
- on memory chips – 58 degrees.
If the ambient temperature is 26 degrees.
With no load, you will have 28 degrees on the memory, and 32 and 34 degrees on the coils respectively. Temperature increases under load extremely fast, and potentially it may cause the chip to tear off from the board (because of the abrupt thermal expansion).
As for the rest of the circuits, I could not reach them with my temperature meter, ordered from China.
And what if I attach the heatsinks and install the second fan?
With the Furry Donut running:
- on the coils to the right (under the fan) – 45 degrees
- on the coils to the left – 46 degrees
- on memory chips – 40 degrees.
If the ambient temperature is 26 degrees.
Why do you need liquid cooling system on your GPU, if there are cheaper air alternatives — Raijintek Morpheus 2, Accelero Xtreme IV Rev.2?
Liquid cooling system, installed on chip, will always be more efficient compared to any air cooling system.
Speaking of Morpheus 2, judging by the results (link) we see the following:
- Under load it gives 65 degrees, which is more or less the same as the default GPU cooling system. Liquid cooling gives 49 degrees.
- These 65 degrees are achieved, when two high speed NF-F12 industrialPPC-2000 PWM fans are installed, and are used at 2000 rpm. You can only imagine the noise they produce.
As for the Accelero Xtreme IV Rev.2, you can review the data here: 74 degrees under load. It’s just a useless swap.
Like this post? You can support me on patreon.

